- The following is licensed under the GNU Free Document License and edits to this page will be released under that license. Therefore, the Creative Commons license we are using for Battlestar Wiki Media is not in effect here.
- Note: This page is taken from the Commonist help page at the Wikimedia Commons and, therefore, this version may be out of date. If so, then please make a mention of it at the talk page for this article.
Commonist is a Java program for easy uploads of large amounts of images to Battlestar Wiki Media and other Mediawiki installations.
Installation
In order to install Commonist you need Sun-Java 1.4.2 or newer:
- Go to Sun-Java download page and download the version for your operating system in case you haven't installed Java.
- Follow the steps of the Java installer.
After you have installed Java:
- Download Commonist from http://djini.de/software/commonist/ and unpack it. It will create a new folder
commonist-x.x.x(x replaced by version number). - On Unix/Linux/Mac-OSX you can run Commonist by executing
bin/commonistbelow thecommonist-x.x.xdirectory, on Windows start it withbin\commonist.batbelow thecommonist-x.x.xdirectory.
If you would like a desktop icon for Commonist on your desktop, you should follow your system's recommendation for adding an icon. In the field defining the executable file enter the full path to the right executable of the two given choices above.
Setup
In order to get Commonist to work with Battlestar Wiki Media, you need to get and install configuration files for Commonist.
- Download the configuration files from http://www.battlestarwiki.org/commonist/bsg-commonist.zip.
- Unzip files.
- Copy bsgwiki.family and bsgwiki.site to $HOME/.commonist/family. ($HOME is either going to be your primary Windows drive, namely C:, or your home directory on Linux/Unix/Apple computers.)
- Windows: $HOME\Documents and Settings\<WINDOWS USERNAME>\.commonist\family
- Copy licenses.txt to the etc directory of your Commonist directory, typically Commonist-x.x.x (with x.x.x being the version number). When prompted, overwrite the original licenses.txt file in that directory.
- Load Commonist. Then follow the instructions in the next sections.
Usage
After you have installed and started the program a small splash screen with a hammer and sickle icon will pop up first. On Windows you will additionally see a terminal window which you can't close while the program is running. The second shortcoming on Windows only is a requester popping up. Click it away with "continue". Shortly after that the interface of Commonist will appear.
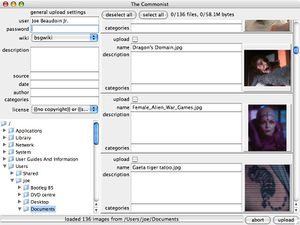
In the lower left you will see a tree view of your file system. Choose the folder which contains the images you want to upload. After you have selected this folder you will notice a small status message at bottom that Commonist is reading the content of the folder and will display on the right side a preview of each file.
General upload settings

In the upper left you see several fields of a mask below the label "general upload settings", on top of which you will find the fields necessary for the account you want to use for upload:
- user
- In the "user" field type in your user name of wiki where you want to upload your images. Note that you enter it without the User: prefix.
- password
- Type in your password for this account there. It will be made invisible to the reader with asterisks (but will be transfered unencrypted over the wire as always when you login to a Wikimedia wiki).
- wiki
- At the "wiki" drop down menu you can select the wiki where you want to upload the file. In case of Battlestar Wiki Media choose "bsgwiki". Note that within that wiki you need to own the very account you specified above.
Further down you can enter general information that will be embedded in the image descriptions of all images you upload. Template:Information is being used for the structured image description (See Battlestar Wiki Media:First steps for details about the template; in other wikis beside Battlestar Wiki Media a free form description without the use of a template is being used by Commonist).
- description
- There you can enter the global description in normal wiki syntax which will be displayed at all image pages of images you upload within that session.
- source
- Use a statement such as “Own work.” or similar, if you created that file yourself. Otherwise please supply a
- Link to a website
- Name of an institution
- Book source
- etc.
- Note that you can only enter one source for all images you upload at once.
- date
- Date of creation of the images you want to upload (or date of release if not available), preferably in ISO 8601 format, such as “taken on 2006-01-08” for an image taken on 8 January 2006.
- author
- Author(s) of the files. If you don’t know any individual, use the name of the institution(s) which released it. In case of self-made work, put your real name and your linked user name in parentheses, such as “Gabor Eszes ([[User:UED77|UED77]])”. This will read as “Gabor Eszes (UED77)”. You might as well directly link your real name to the user name such as “[[User:UED77|Gabor Eszes]]”.
- categories
- Enter one specific category there that fits to all of your images you want to upload without the namespace prefix or leave it blank in case you want to add the images afterwards to a gallery page. Several categories get separated by a vertical bar: “|”. That way you can enter categories containing commas. Be as specific as possible. Don’t add an image to an overcrowded root category like "Astronomy". In order to find a right category for your images the category list will help you.
- license
- In the Battlestar Wiki Media repository it is essential that every file is correctly licensed. So choose out of the "license" the license you want to use for your images. For correct licensing please see Battlestar Wiki Media:Licensing. In case you did not find the right license leave it blank and have a look at our image tags but don't forget to add the correct license tag afterwards, otherwise your files will be deleted.
Image forms
On the upper right you see two buttons labeled "deselect all" and "select all". If you click these buttons you can check/uncheck the upload status of all images in your current collection. The upload status is indicated at the upload check box next to each single file thumbnail. You can manually check/uncheck single files as well by clicking on the individual check box.

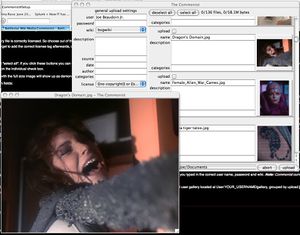
If you click on the thumbnail of an image (single click) a window with the full size image will show up as demonstrated in the screenshot.
Next to each image thumbnail you will also find the following form fields:
- name
- At the "name" field you can change the destination name of the file. By default, your local filename will be used. If this is a non-descriptive name - e. g. a name like “DSC123456.jpg” from a digital camera please change it there (it will only be changed for the upload but not locally on your computer). Cryptic names for images render them a lot harder to find and use. Secondly, it is very likely that another user wishes to upload a file with the very same name but different content, causing that the file of the other user will suggested for deletion. Therefore it is recommended that you use proper filenames for Battlestar Wiki Media. Take special note of this, you will not be able to rename your file once it has been uploaded.
- description
- At the "description" field you can enter the individual description in normal wiki syntax which will be displayed at the image page (additionally to the general one if being used). So please give a good description of the content of each file there. What do you see, hear, or otherwise perceive? If it's an item of artwork, please provide a brief historical background. In case of scientific data, a brief scientific abstract of the file. Descriptions can be in any language, but it is always a good idea to include an English description as well. If you can speak multiple languages, consider adding the description in all of them (simply use the *-sign for a list item at the beginning of a new line and the ISO-Code of the language in bold print and write after that the description in the specified language, like in this code example for English: "
*'''en:''' Example description"). - Attention: You may wish using the Information template. Doing so in the current version of Commonist (0.2.7) will cause nesting your info box into the automatically generated one; thus requiring editing each uploaded file.
- categories
- In the "categories" field you can specify additional categories (without the category namespace prefix) for sorting of the image, separated by a vertical bar. Please also try to be as specific as possible. Try to avoid using more than two topic categories per image.
Upload
After you have finished your preparations for the upload click on the "upload" button in the lower right corner of the main window. Now you will see a status bar at the bottom line explaining what Commonist doing. You can cancel the upload at any time by clicking on "abort" next to the "upload" button. If everything works well, it will display first the login procedure and then the upload status of the single files there. If something went wrong please check if you typed in the correct user name, password and wiki. Note: Commonist currently does not support proxies.
Every uploaded file will be added automatically to your watchlist, so that you can always track the changes by others to your files. Every uploaded file also will be added to a personal user gallery located at User:YOUR_USERNAME/gallery, grouped by upload jobs and upload date, with the image description as description of the thumbnail, so that you will automatically have a pleasant overview of all of your uploads.
Bugs and feedback
- On Windows there is a terminal window which may not be closed without closing the Commonist program as well.
- On Windows a requester pops up at startup.
- Commonist does not currently work over proxies.
For feedback to the program author please stop by at http://djini.de/software/commonist/.
